
|
TSD's Web Scheduler Integration for Rentals & Test Drives
The TSD Web Scheduler is sold separately. Contact your TSD Sales Representative at sales@tsdweb.com for more information.
TSD’s Web Scheduler integrates with your website to optimize your online booking process for rentals and test drives.
This integration communicates with one of TSD’s APIs to retrieve your latest availability information from the system, so your customers can use the embedded Scheduler iFrame to book reservations that push to the TSD DEALER application as appointments.
Rentals with TSD's Web Scheduler
Setup Requirements in TSD DEALER
To make sure the Scheduler iFrame on your website contains the latest availability information, make sure you’ve performed the following setups in TSD DEALER:
- (Performed by TSD) Rate charging for rental types of appointments / agreements must be turned on by TSD. Contact TSD Support at support@tsdweb.com for more information.
- (Performed by TSD) TSD must turn on exposed rates for the web scheduler. TSD must turn on the Expose Externally and Enable Rez Scheduler settings to expose rates on the web scheduler iFrame. Contact your TSD Sales Representative at sales@tsdweb.com for more information. .
- Turn on automatic texting and emails. To make sure you customers are notified when an appointment is booked, enable texting and/or emailing within the Auto Texting and Emails setting.
- Turn on Expedited Appointments. Use the Expedited Appointments setting to turn on this feature, which includes a link to access the appointment in your automated appointment confirmation texts and emails. See "Expedited Appointments" for a full list of setup requirements and options.
- (Performed by TSD, if applicable) TSD must turn on automatic texting for Web Schedulers. If you use a auto texting and Expedited Appointments along with a Web Scheduler or BDC integration, TSD must turn on auto texting on these appointments. Contact TSD Support at support@tsdweb.com for more information.
- Create Model Groups. Edit the Model Groups setting to create Model Groups that will display for booking.
- Set up and expose rates, taxes, and fees for rentals.
- Set up rates. Edit the Rental Rate Setup setting. Add rates by doing the following:
- Create Rate Codes for different types of rates.
- Add hourly, daily, weekly, and monthly rate amounts, as needed.
- Expose the Rate Codes to be made available externally on the Web Scheduler.
- Set up taxes. Make sure you've set up taxes that apply to charges in your location using the Taxes Setup setting.
- (Optional.) Add fees. If you want to make fees available for selection during the rental booking process, review and add fees using the Fees Setup setting, and expose the fee externally, so it's displayed on the Scheduler.
- Set advance booking hours for same-day appointments. Use the Web Scheduler - Advance Booking Hours management setting to specify the minimum number of hours allowed between the current time and a checkout time when booking a same-day appointment through the Web Scheduler. That way, customers cannot book too close to the current time and you have adequate notice to prepare. For example, if you enter 2 hours, then at 1:15PM, customers can only choose a pickup time of 3:15pm or later.
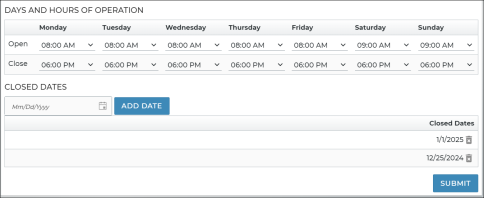
- Set up location hours of operation and closed days. Make sure customers booking appointments through the web scheduler cannot select a day or time your location is closed. Head to the Company tab and edit a location to manage its hours of operation and closed days for appointments booked through the scheduler. See "Set hours of operation" for more information.
- Additional setup options: While the following items are optional, you may want to consider them to take full advantage of the Web Scheduler feature:
- Add model names, photos, and slogans to be displayed on the iFrame. You have the option of displaying names, images, and slogans for each Model Group on the Vehicle tab of the Scheduler iFrame embedded on the website. Use the iFrame Assets management setting to configure these names and descriptions, and upload photos.
- Set up a daily appointment cap. Use the Daily Appointment Cap setting to prevent overbooking and limit the number of appointments that can be scheduled for pickup on any given day, and, if applicable, Model Group-specific caps for rental appointments.
- Turn on alerts for booked appointments. Use the Alerts Hub setting and toggle on "Alert Panel", "Email", and/or "Text Message" for the following alerts:
- Appointment Booked: Get an alert when an appointment is booked.
- Appointment Submitted Remotely: Get an alert when a customer submits information on an Expedited Appointment.
- Add rental requirements. You have the option of summarizing your location's requirements and disclaimers for rentals using the Rental Requirements management setting, so they're accessible for customers via a View Rental Requirements link on the Review tab of the Scheduler. For example, you might include things like minimum age, a driver's license, and proof of insurance, as well as key disclaimers such as pet and smoking regulations, mileage limits, and more.

Rental Booking: The Process
A customer begins the rental reservation process on your website, which contains the TSD-hosted Scheduler iFrame. What happens from there? The following steps explore the rental booking process from your customer's perspective.
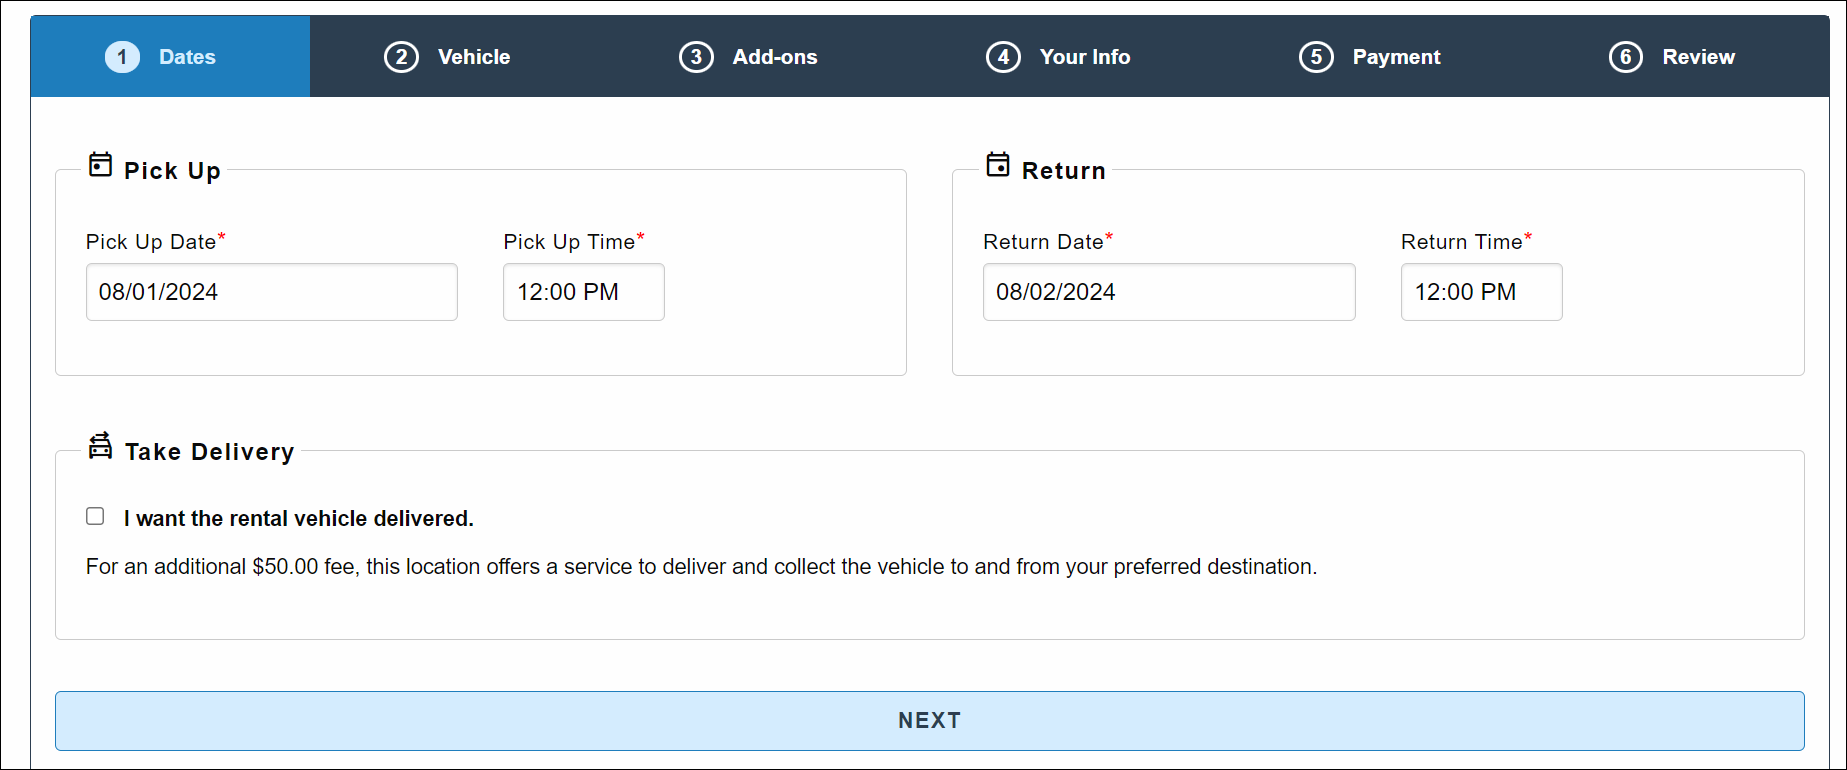
- (Dates tab) Choose a date range for the rental. Choose a Pick Up Date / Time and Return Date / Time. For locations with TSD's Delivery and Collection module, an "I will need the rental vehicle delivered" check box is present for the customer to have a unit delivered.
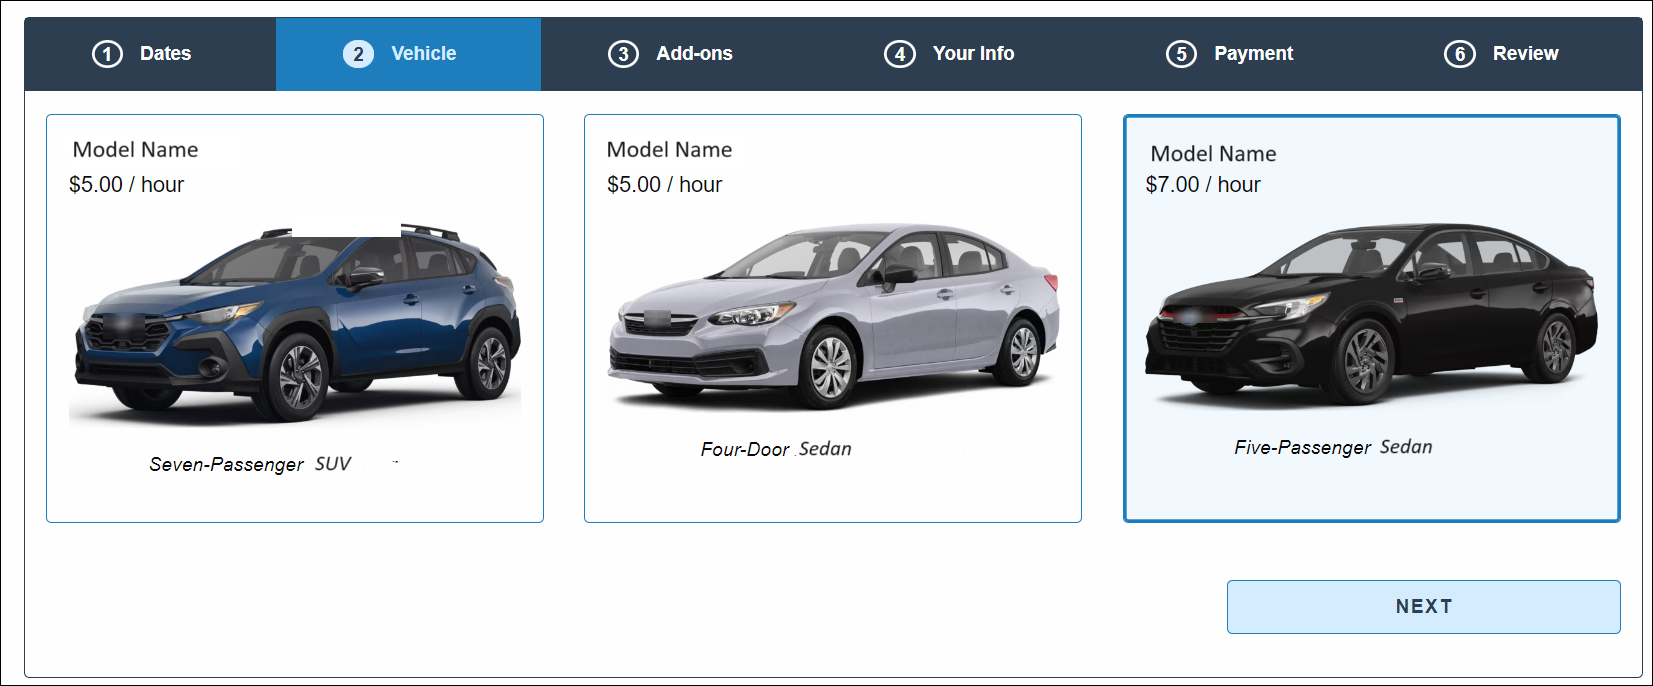
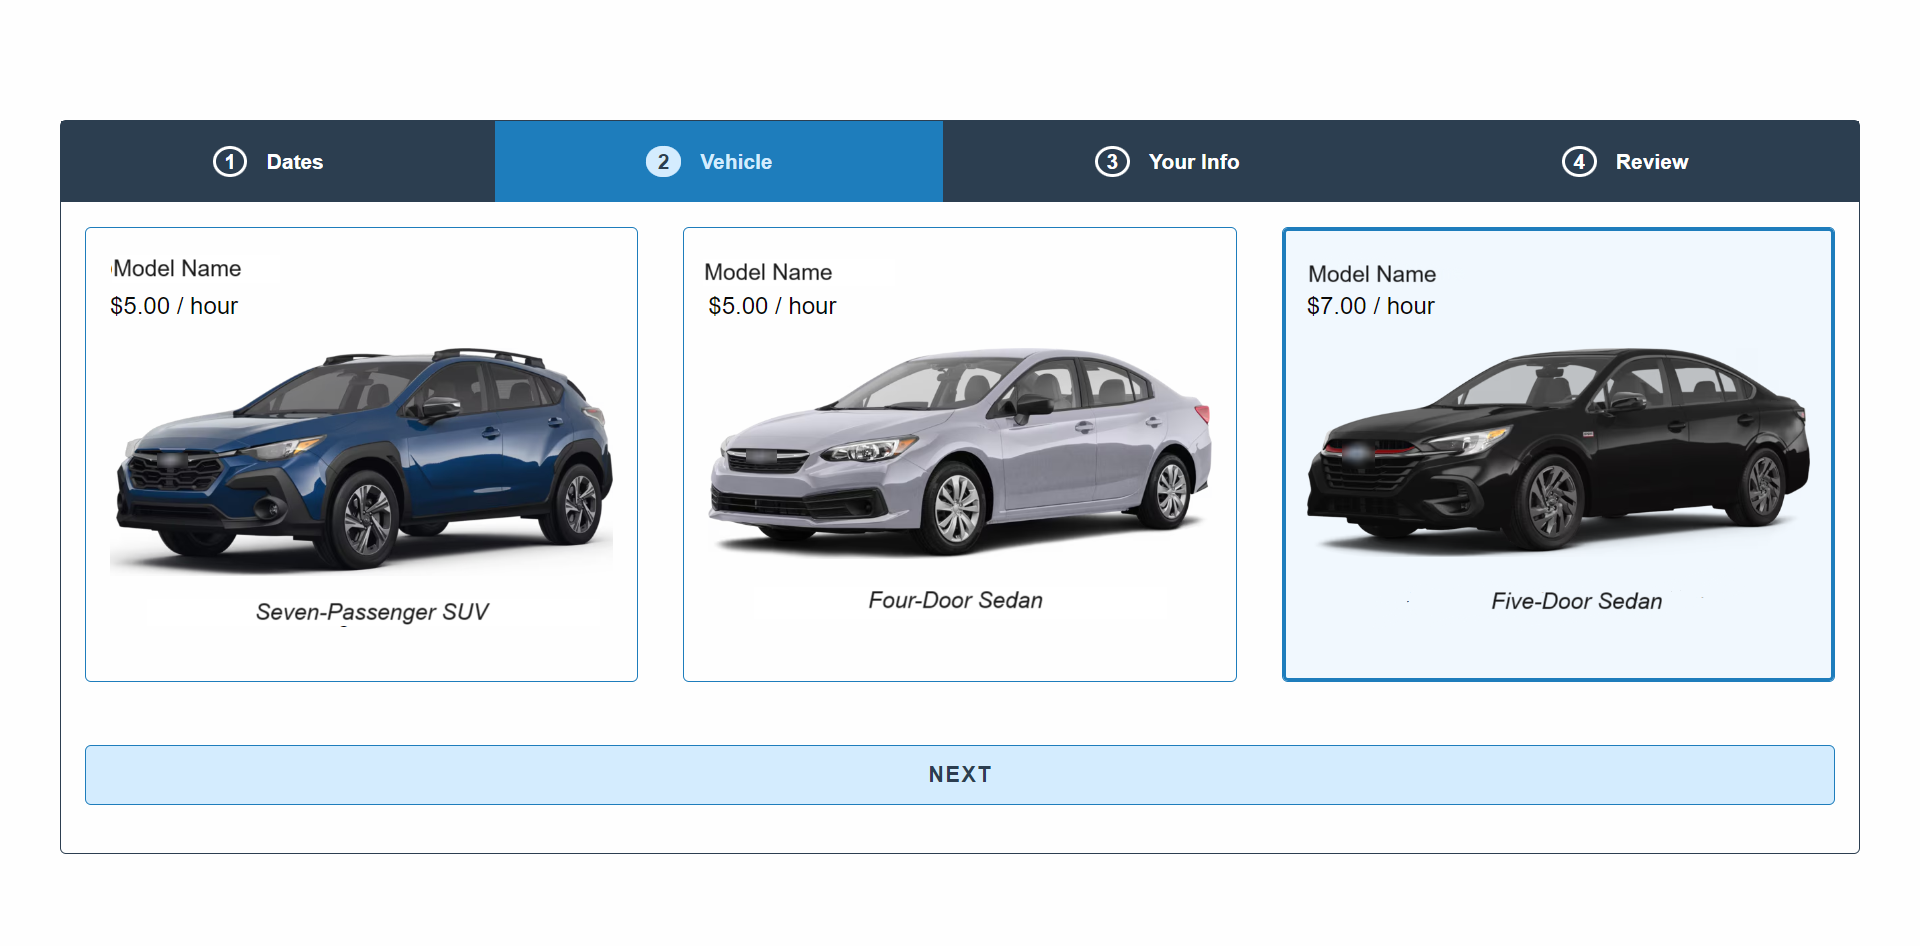
- (Vehicle tab) Select a vehicle model and applicable rate. Choose from one of the models available for the selected date range. Associated with each model may be a photo and description, based on your dealer or manufacturer's iFrame Assets management setting, as well as an associated rate for that model.
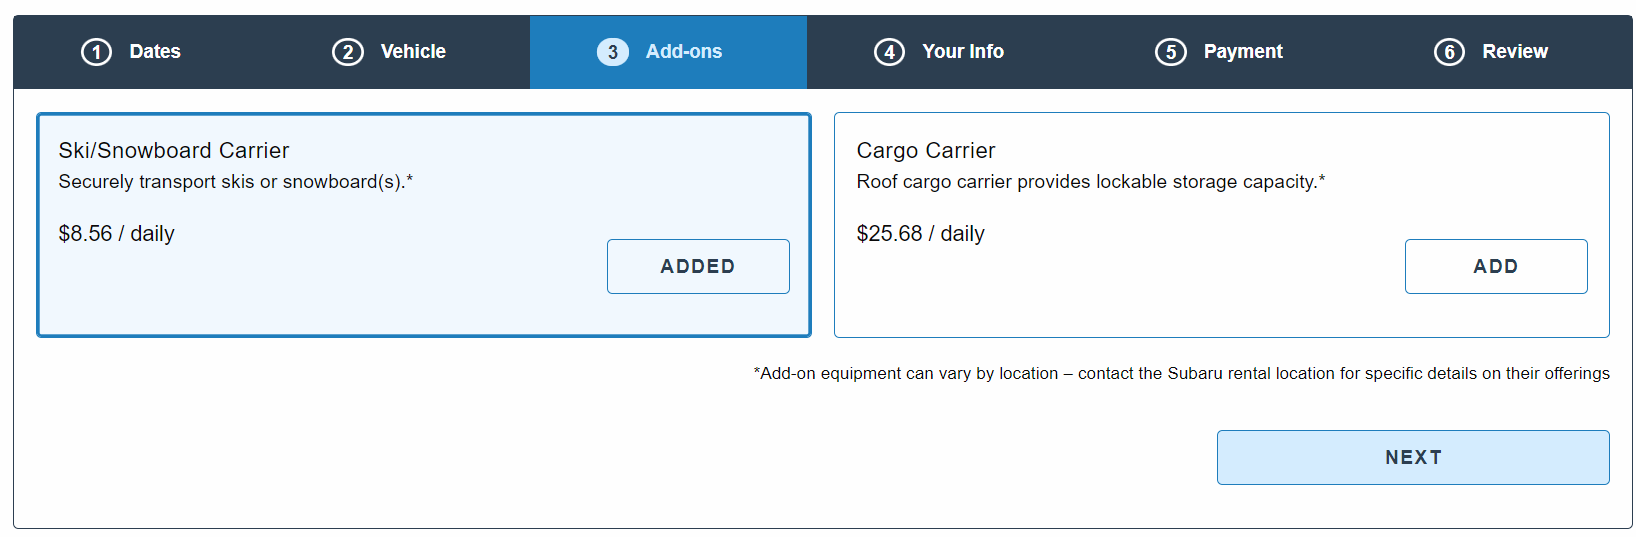
- (Add-ons tab) Choose add-ons. Add-ons are additional fees your location has set up to be externally exposed.
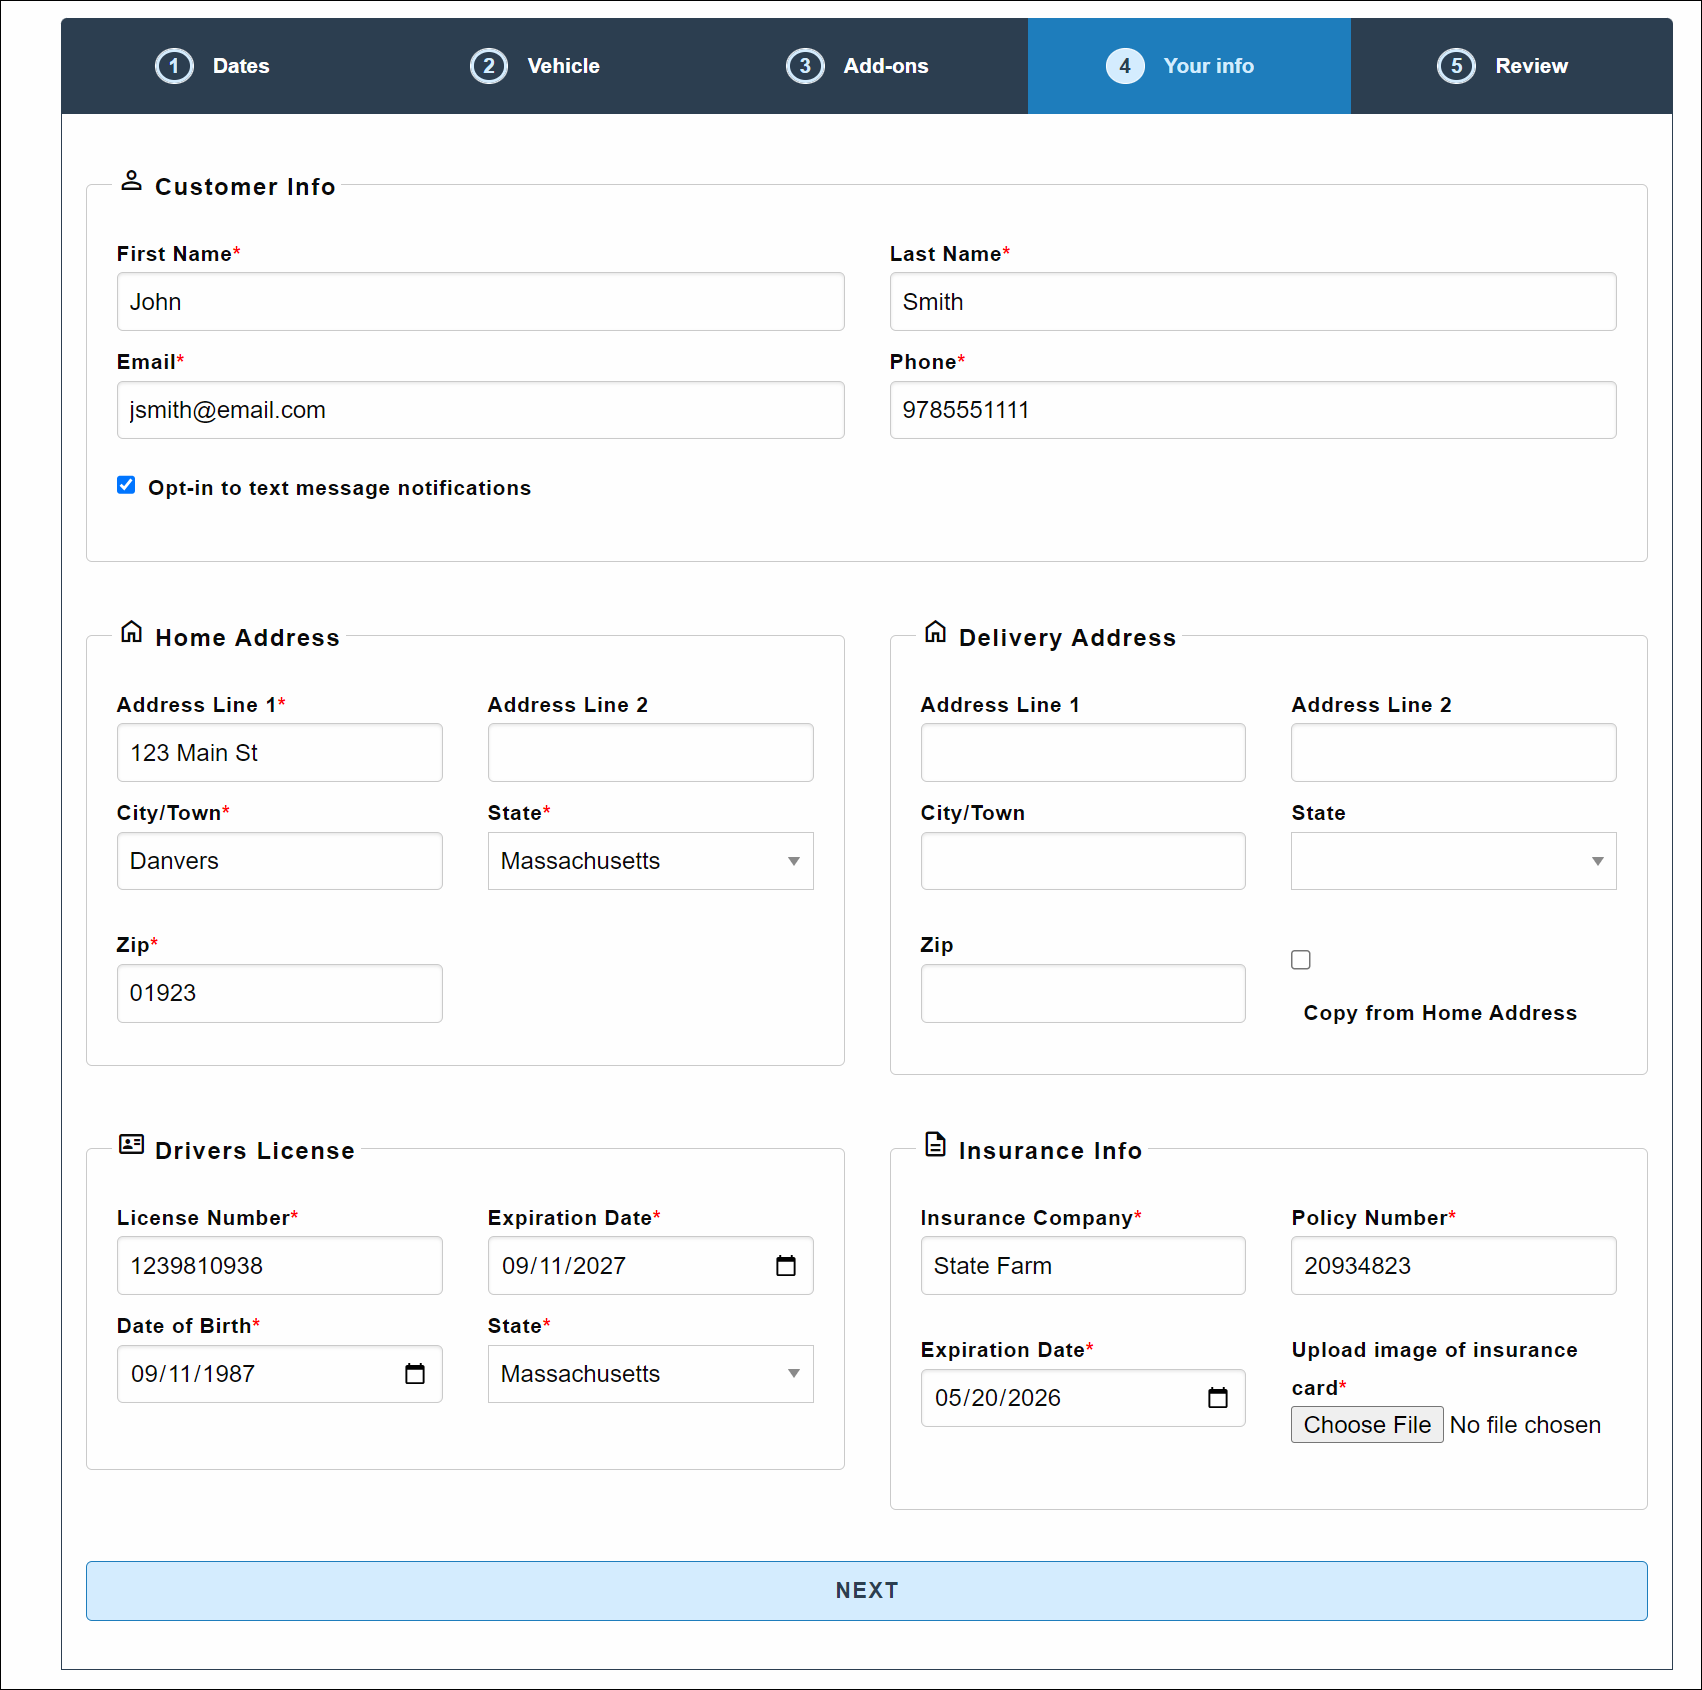
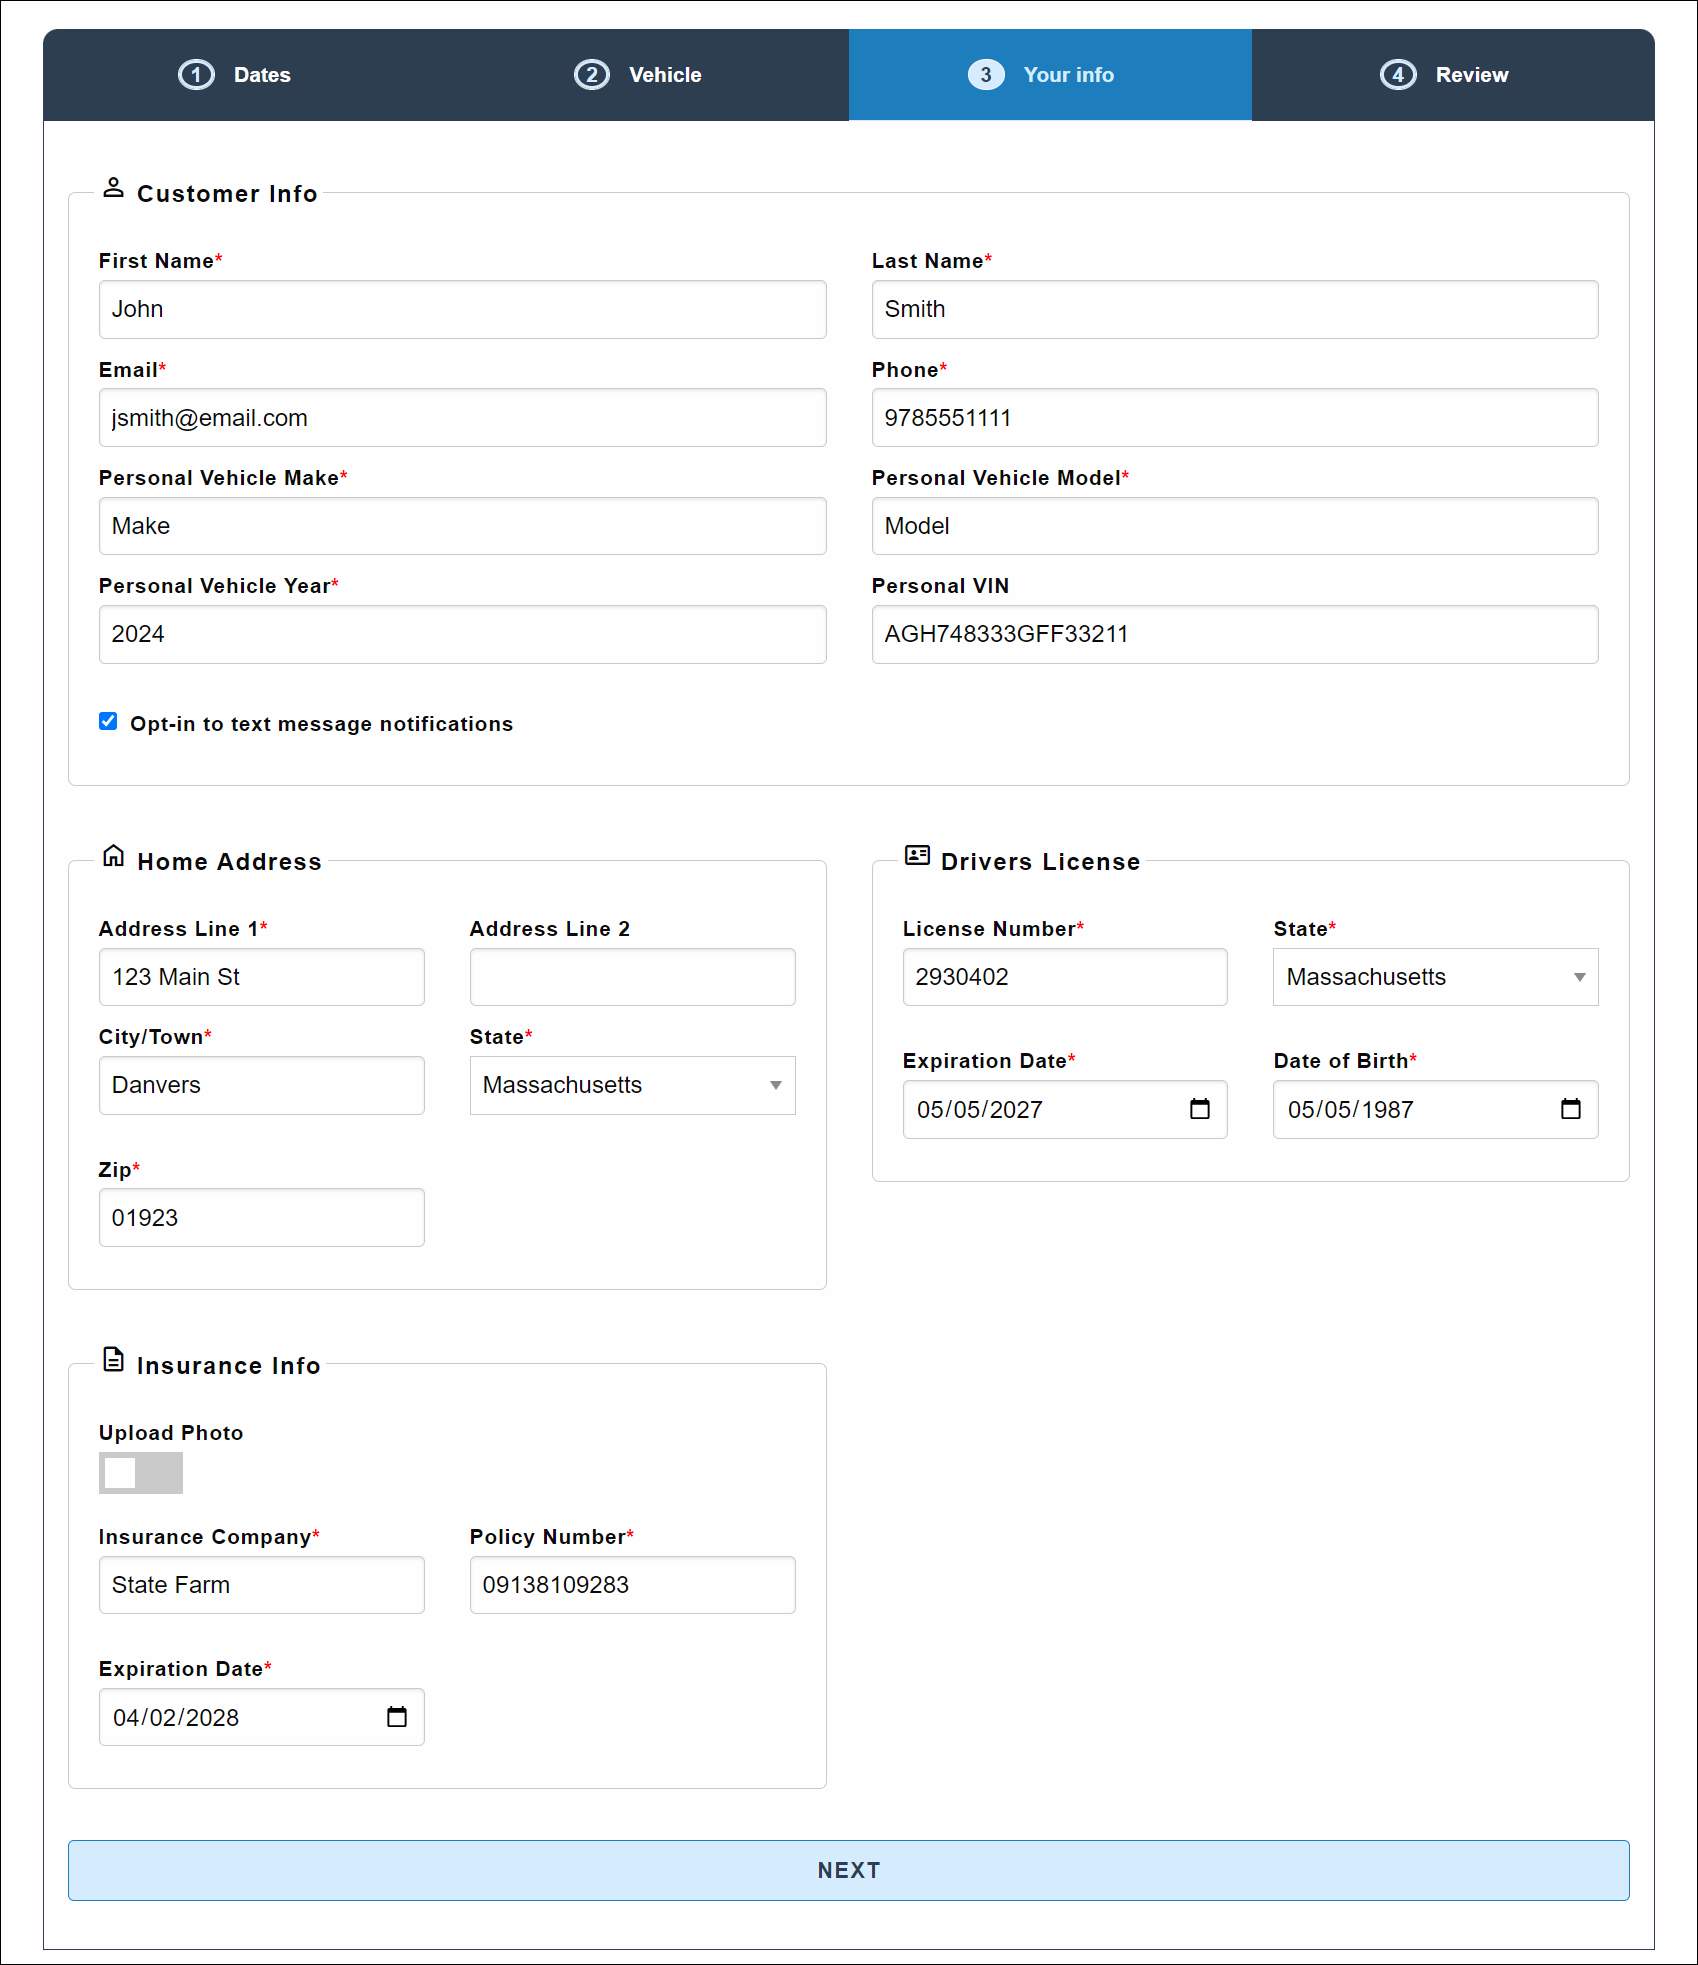
- (Your Info tab) Enters key information. Enter key information, such as name and contact information (a "Receive Status Text Messages" check box is here to opt to receive texts to the phone number), home address, driver's license, and automobile insurance information or a photo.
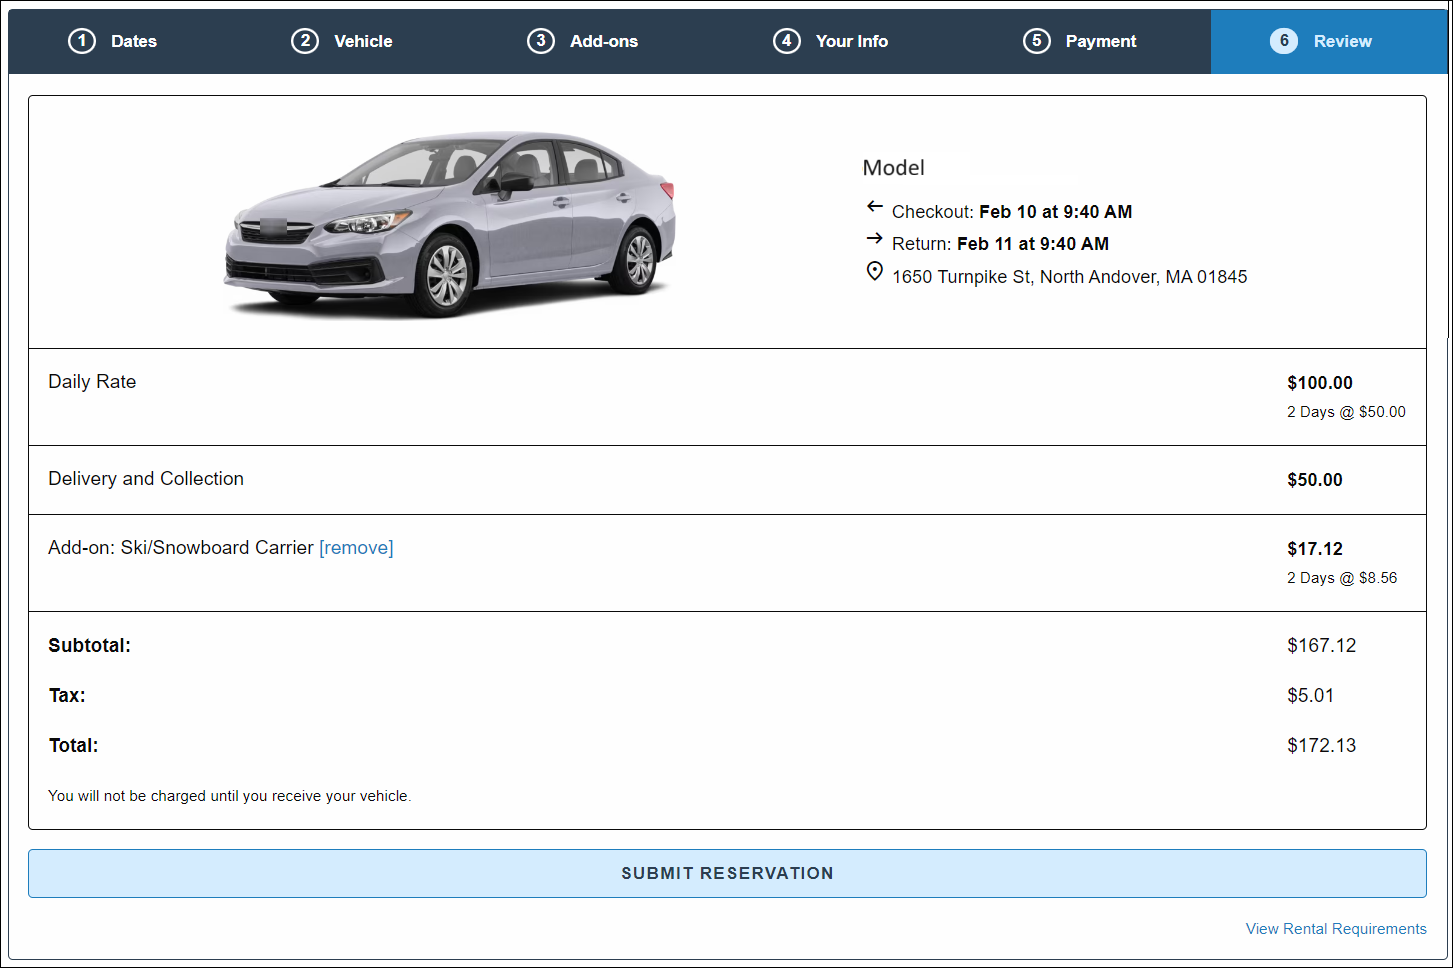
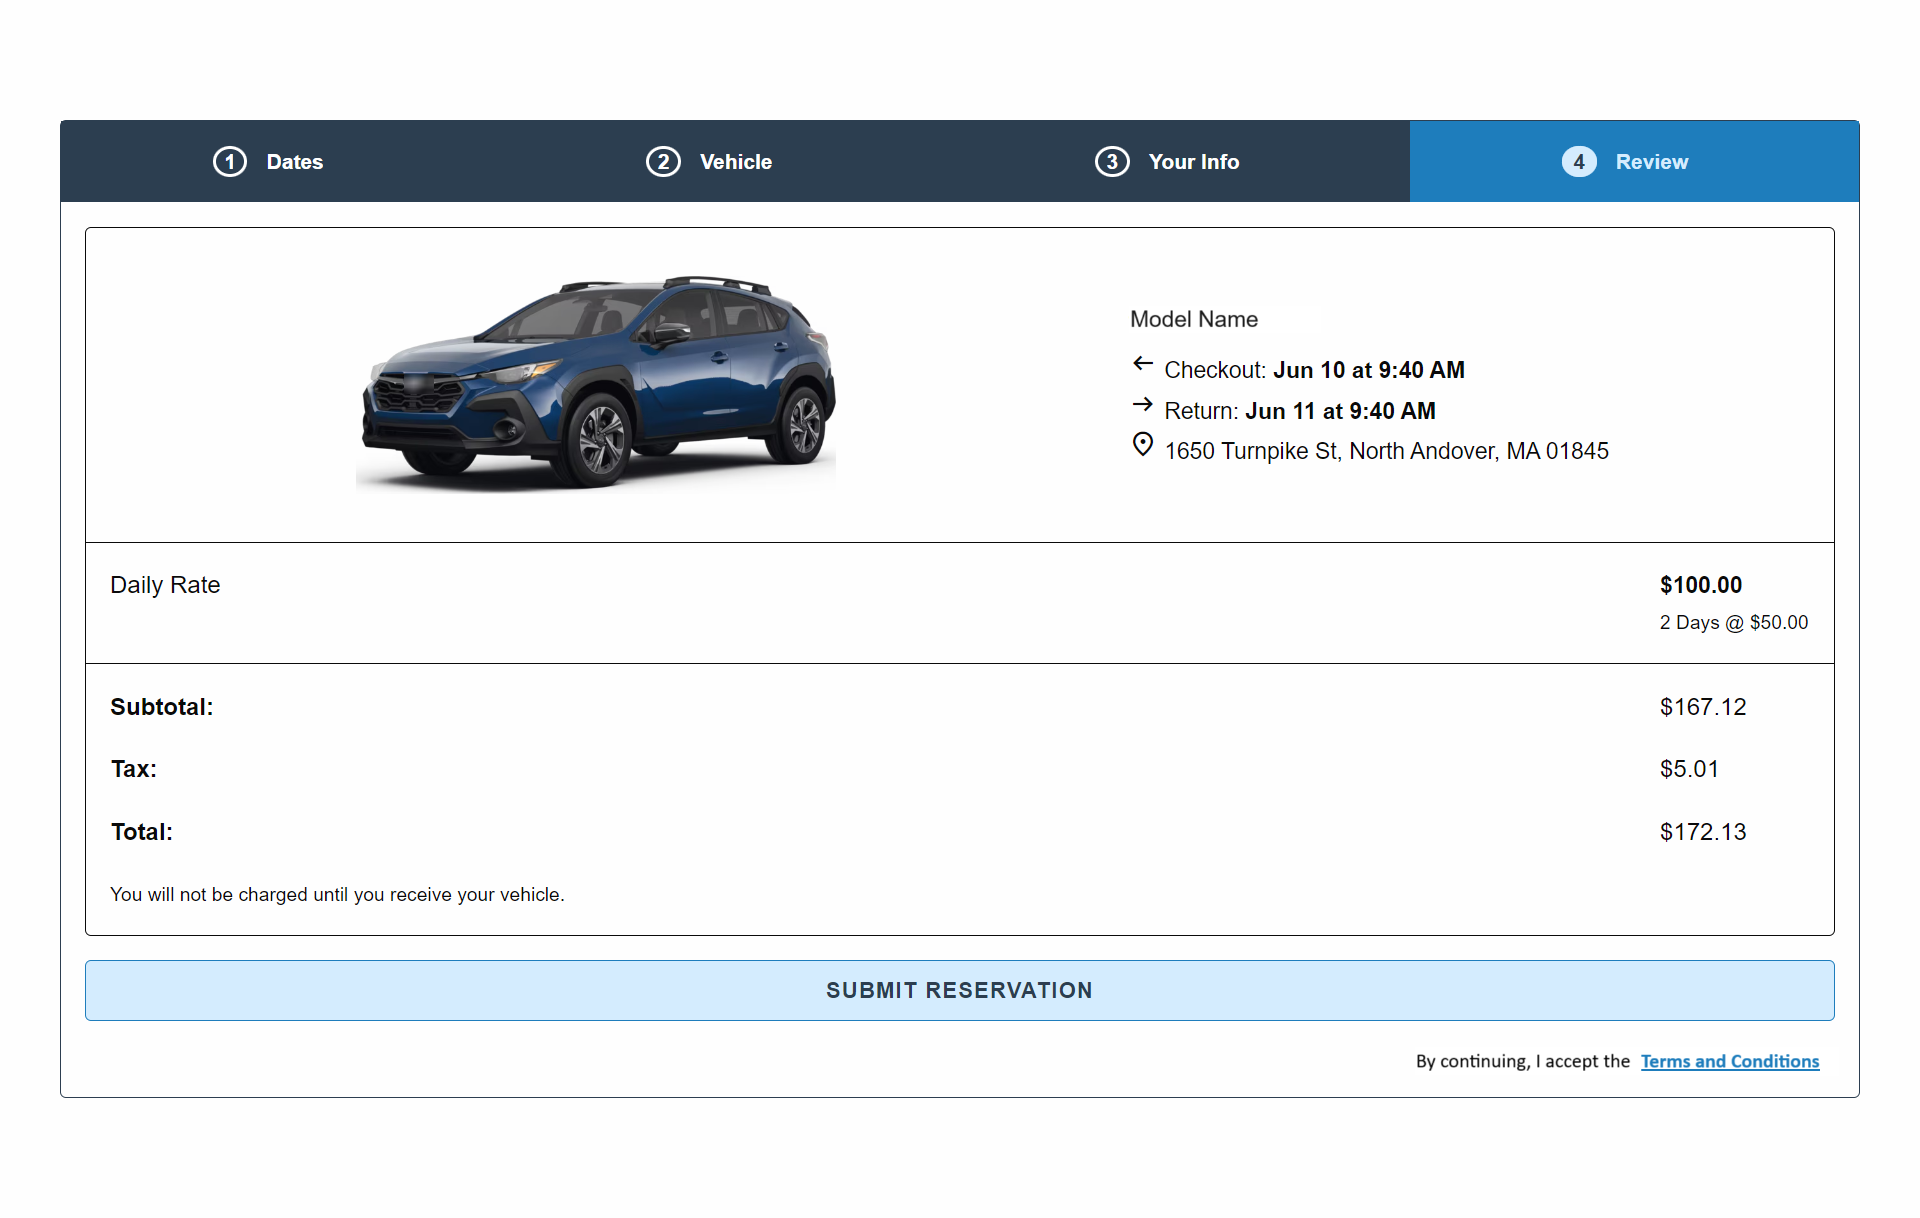
- (Review tab) Review details and submit the reservation. Review a summary of the reservation details, including the rate, fees, taxes, subtotal, and total amount due. A View Rental Requirements link is also available at the bottom of this tab to view requirements, if present based on yours or your manufacturer's Rental Requirements setting. Click Submit Reservation.
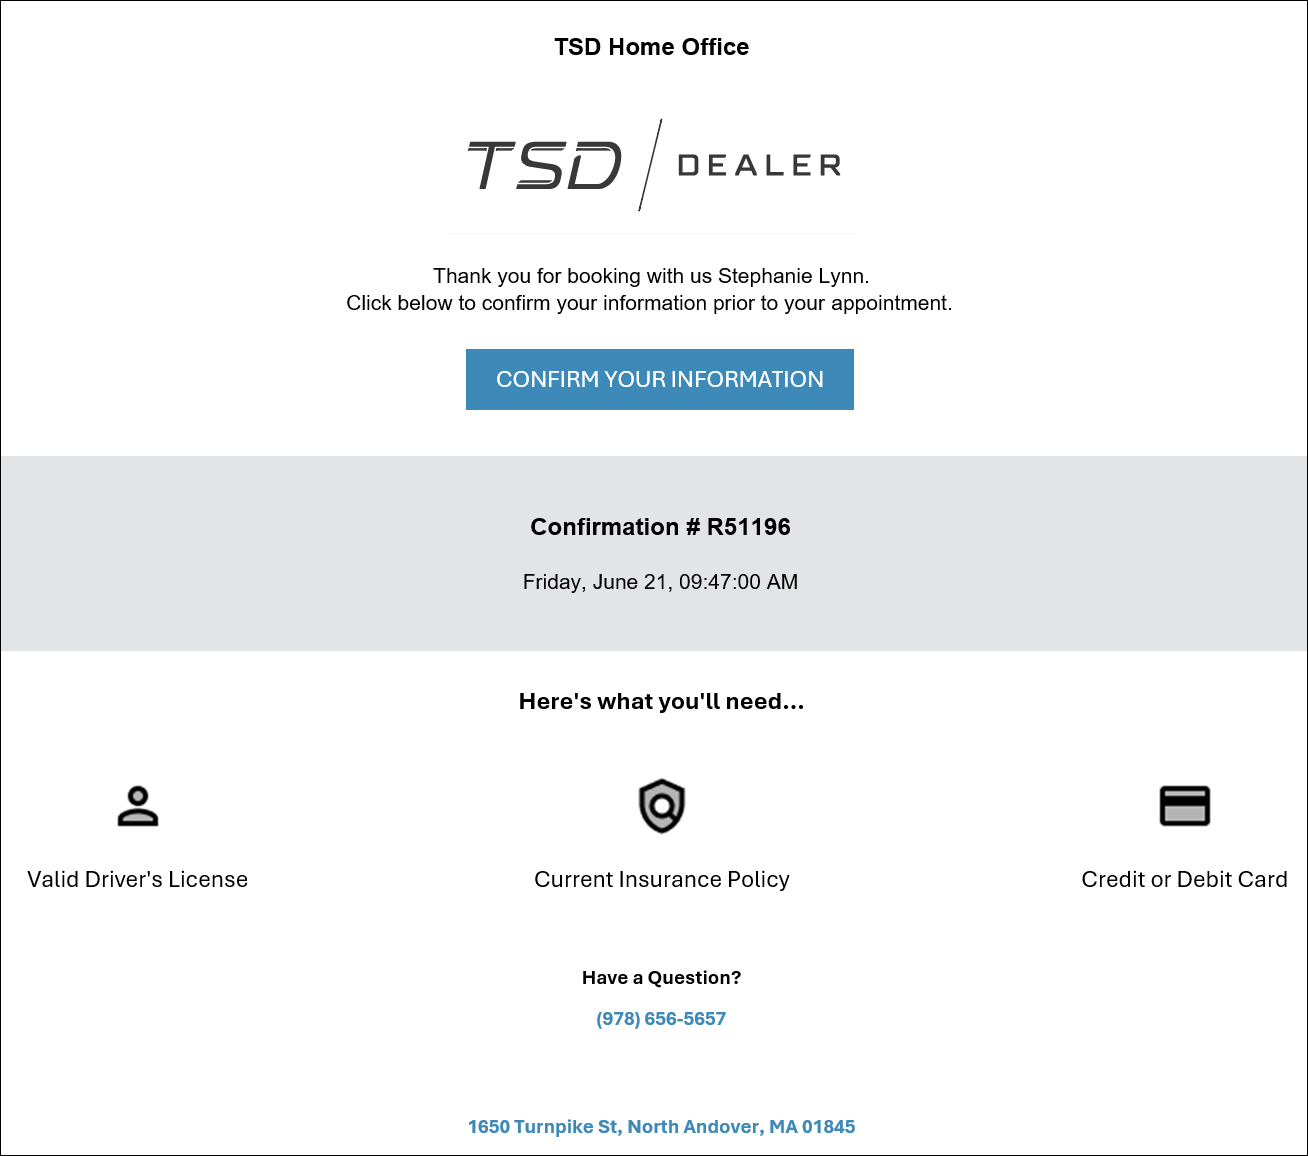
- The appointment is booked! If you have Auto Texting and Emails and Expedited Appointments set up, your appointment confirmation text or email includes a link to the appointment, so your customer can submit information in advance and have a faster checkout experience.
Hover to view the full-sized image.
Note: Validation is applied for same-day appointments so that 1) the Return Time must be after the Pick Up Time, and 2) the minimum number of hours must be present between the Pick Up Time and the current time, based on your location's Web Scheduler - Advance Booking Hours management setting.
Hover to view the full-sized image.
Hover to view the full-sized image.
Hover to view the full-sized image.
Hover to view the full-sized image.
Hover to view the full-sized image.
You can view and edit the appointment in TSD DEALER, create an agreement, and more.
Test Drives with TSD's Web Scheduler
Setup Requirements in TSD DEALER
- Rate charging for test drive types of appointments / agreements must be turned on by TSD. Contact TSD Support at support@tsdweb.com for more information.
- (Performed by TSD) TSD must turn on exposed rates for the web scheduler. TSD must turn on the Expose Externally and Enable Test Drive Scheduler settings to expose rates on the web scheduler iFrame.
- Create Model Groups. Edit the Model Groups setting to create Model Groups that will display for booking.
- Set up and expose Test Drive rates / models. That way, models can be exposed on your website.
- Edit the Test Drive Rate Setup setting.
- Create a Rate Code to categorize the rate.
- Add hourly, daily, weekly, and monthly rate amounts, as needed. (You can enter 0.00 as a rate, if you're not charging.
- Make sure the Expose toggle is turned on.
- Set advance booking hours for same-day appointments. Use the Web Scheduler - Advance Booking Hours management setting to specify the minimum number of hours allowed between the current time and a checkout time when booking a same-day appointment through the Web Scheduler. That way, customers cannot book too close to the current time and you have adequate notice to prepare. For example, if you enter 2 hours, then at 1:15PM, customers can only choose a pickup time of 3:15pm or later.
- Turn on automatic texting and emails. To make sure you customers are notified when an appointment is booked, enable texting and/or emailing within the Auto Texting and Emails setting.
- Turn on Expedited Appointments. Use the Expedited Appointments setting to turn on this feature for your location, which uses automated texts and emails to send customers a link to the appointment to submit key information in advance. Expedited Appointments contains a few setup options to customize the look-and-feel of your messages. See "Expedited Appointments" for a full list of setup requirements and options.
- Set up location hours of operation and closed days. Make sure customers booking appointments through the web scheduler cannot select a day or time your location is closed. Head to the Company tab and edit a location to manage its hours of operation and closed days for appointments booked through the scheduler. See "Set hours of operation" for more information.
- Additional setup options: While the following items are optional, you may want to consider them to take full advantage of the Web Scheduler feature:
- Add model names, photos, and slogans to be displayed on the iFrame. You have the option of displaying names, images, and slogans for each Model Group on the Vehicle tab of the Scheduler iFrame embedded on the website. Use the iFrame Assets management setting to configure these names and descriptions, and upload photos.
- Turn on alerts for booked appointments. Use the Alerts Hub setting and toggle on "Alert Panel", "Email", and/or "Text Message" for the following alerts:
- Appointment Booked: Get an alert when an appointment is booked.
- Appointment Submitted Remotely: Get an alert when a customer submits information on an Expedited Appointment.
- Add test drive terms and conditions. You have the option of summarizing your location's terms and conditions for test drives using the Web Scheduler: Test Drive Terms and Conditions management setting, so they're accessible for customers on the Review tab of the Scheduler.

Test Drive Booking: The Process
A customer begins a test drive booking on your website, which contains the TSD-hosted Scheduler iFrame. What happens from there? The following steps explore the reservation booking process from your customer's perspective.
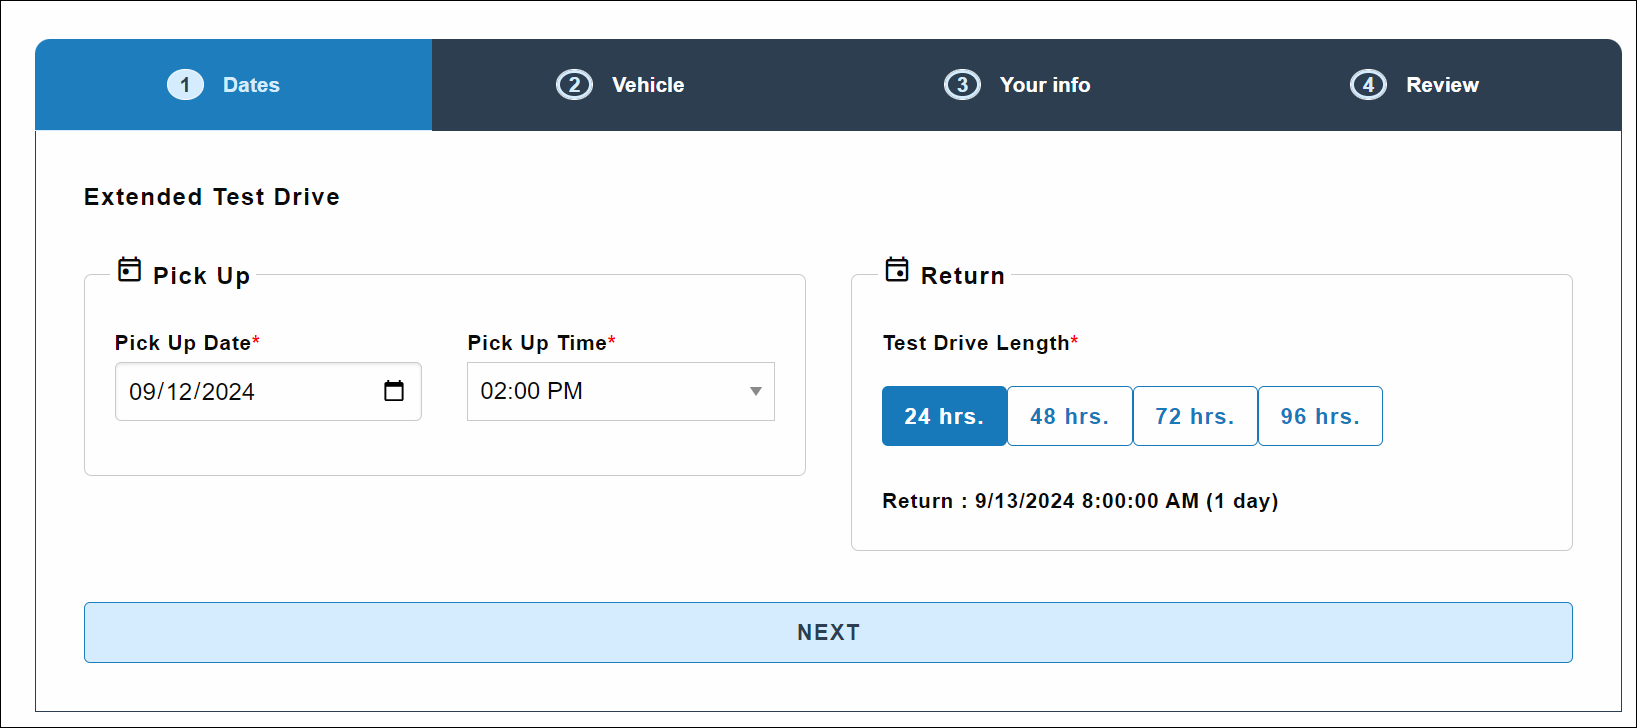
- (Dates tab) Choose pickup date / time and test drive length. The customer chooses a Pickup Date and Pickup Time, then selects the test drive length interval (e.g., 24 hours), based on your location's Web Scheduler Test Drive Intervals management setting. The return date and time and duration is shown.
- (Vehicle tab) Select a vehicle model and applicable rate. The customer chooses from one of the models available for the selected date range. Associated with each model may be a photo and description, based on your dealer or manufacturer's iFrame Assets management setting, as well as an associated rate for that model.
- (Your Info tab) Enter key information. The customer enters his or her information, such as name, personal vehicle information, contact information (an "Opt-in to text message notifications" check box is here to agree to receive texts to the phone number), home address, driver's license, and insurance information or an insurance card photo.
- (Review tab) Review details and submit the reservation. Review a summary of the reservation details, including the rate, taxes, and total amount due. Click Submit Reservation.
- View the appointment in TSD DEALER. If you've got Expedited Appointments set up, a text or email is sent to the customer with a link to the appointment, so they can submit information in advance and have a faster checkout experience.
Hover to view the full-sized image.
Hover to view the full-sized image.
Hover to view the full-sized image.
Hover to view the full-sized image.
Note: Terms and conditions may be accessible here, if set up. Read more:![]()
Hover to view the full-sized image.
You can view and edit the appointment in TSD DEALER, create an agreement, and more. See "Appointment Hub" for more information
Web Scheduler Best Practices
To ensure your web scheduler receives accurate availability information, make sure your fleet and agreement information in TSD DEALER is up-to-date by:
- reviewing your Appointment Caps, including Model-specific rental appointment caps, and adjusting the cap based on your volume of business. Generally, if a cap is left too high, there is risk of overbooking. If left too low, it is likely that units will go unused.
- tracking open agreements, updating Expected Return Dates, and updating unit statuses, as necessary.
- communicating with customers and providing updates when service is complete.
- closing agreements as soon as the unit is returned.
© 2026 TSD Rental, LLC